Editor’s Note: This article was first published in Photonics Online. You can read the original article here.
In a previous article, we spoke about the basic components of steered beam fiber laser markers and how they work together to comprise a complete system. We also spoke about categories of part shapes and what must be done to apply a laser mark to different shapes. In this article we would like to discuss the types of marking that can be accomplished with fiber lasers.
In our first article we stated “Different laser types are suitable for different materials. If one wanted to mark wood, for example, the optimum wavelength of light for that material is produced by a CO2 laser. If one wanted to mark metals, the optimum wavelength would be produced by a YAG or fiber laser. The material to be marked dictates the type of laser that is needed. There is no such thing as a laser that is well-suited for all materials.” All metals and many non-metal materials are good candidates for marking with a fiber laser. The non-metal materials are usually plastics of one type or another.
Generally speaking, there are three primary marking techniques that can be performed with a fiber laser:
- Ablation
- Engraving
- Stain Marking (Frequently referred to as Annealing)
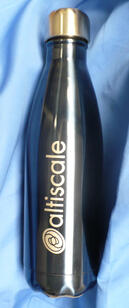
Laser ablation is the removal or vaporization of material from the surface of some material or substrate. Ideally, the laser light is absorbed on the surface of the part and there is minimal penetration into the part. Some examples of ablation marking would be removing anodize from the surface of an aluminum substrate or removing the metallic film on the outside of a piece of coated plastic. In both of these examples, the objective is to achieve a contrasting mark on the surface of the part without engraving into it (as seen below).
The laser settings that one might use for ablation marking are not the same as one would use for engraving. Faster marking speed (speed that the scanning mirrors are moving the laser beam over the surface of the part) and lower laser output power are typically what are used for ablation marking. If too much laser power is applied for too long, then the result will be material removal from metal substrates and melting into plastic substrates. Some materials are so sensitive that shorter laser pulse widths are necessary. The pulse width is the amount of time that the laser is on for each laser pulse. Remember, the laser marks lines by making a series of overlapping pulses rather than putting out a continuous beam of light. Variable pulse width fiber lasers allow control of the time of each laser pulse and are capable of producing very short laser pulses, although those lasers tend to be significantly more expensive than fixed pulse width fiber lasers. Since power is equal to energy/time, shortening the time of each laser pulse can increase the peak power applied to the surface of the material by the laser while decreasing the time that the energy from the laser is applied to the material. The combination of high peak power and short pulse width is ideal for ablation type marking.
I don’t mean to suggest that variable pulse width fiber lasers are necessary for ablation marking on all materials. A fixed pulse width fiber laser will provide a laser pulse width of 100-120 nanoseconds which will handle the vast majority of ablation applications as well as providing a long enough laser pulse width for other marking types.
Engraving- Some products or applications require that the marking goes deeper into the material. This is normally limited to metal substrates as engraving deeper into plastic substrates usually results in an unacceptable amount of melting. Deeper laser engraving is useful when the surface of the part is subject to wear or abrasion or if the engraved mark requires color filling. Some applications, such as firearms marking, have a depth specification in order to make the marking difficult to remove.
Increased laser power and lower marking speeds are the trademarks of deep laser engraving. Our experience at Jimani is that deeper laser engraving is best accomplished with marking speeds of about 5-10 inches/second using multiple passes in order to remove thin slices of material until the desired depth is achieved. Using very slow marking speeds in order to remove a lot of material in a single pass will result in a slaggy bottom in the trough of the engraving and an accumulation of slag at the edges of the engraving. Multiple laser passes with different fill angles at higher speeds allow for more material removal and cleaner troughs and edges. More laser passes results in deeper marking until the laser beam begins to go out of focus or the vaporized material can’t escape from a very narrow trough.
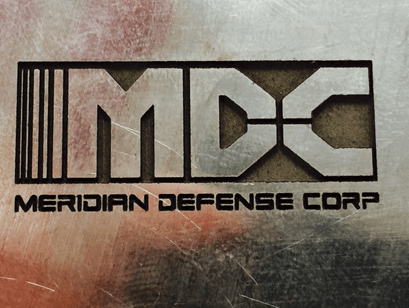
I began an earlier article by stating that laser marking is like burning leaves with a magnifying glass. If the leaf is not at the focal point of the magnifying glass lens, then there is not a high enough concentration of sunlight to set the leaf on fire. The same thing is true with laser engraving. If a substrate is far enough away from the focal point of the lens of a laser marking/engraving system, then there is not a high enough concentration of laser light to burn away or vaporize material. That distance defines the depth of focus of the laser marking system and it is a combination of the focal distance of the lens and the quality of the laser beam going into that lens. Engraving depths into metal of say .010-.015 inches is achievable with a single lens positioning but beyond that, it would be best to reposition the lens a bit. I’ve engraved .250 inches plus into a steel substrate (as seen below) but that was accomplished by repositioning the lens many times and it took a lot of time. From a practical standpoint, a fiber laser system designed for general purpose marking and engraving is probably the wrong tool for this.
The limitation for deep engraving into metal is usually the width of the engraving. Imagine that the engraving consists of a line of text with .060 inch high characters. The line width of each character is going to be pretty narrow (say .010 inch or so) and as the engraving gets deeper, the newly vaporized material tends to collect on the sidewalls of the engraved trough rather than be blown out of the trough. Laser cutting systems address this issue by directing high velocity jets of air through nozzles placed near the center of the focusing lens but this technique doesn’t work with the F theta lenses used in steered beam laser marking systems. The practical limit for deep engraving narrow line widths is .020 inches or so.
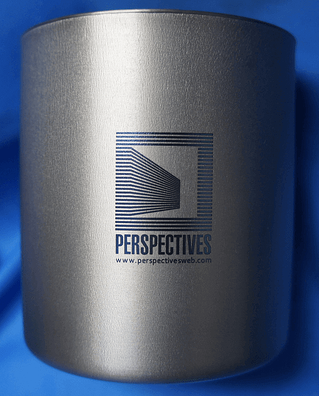
Stain Marking- If the spot size of the focused laser beam is made large enough on certain material types, the laser will heat the material rather than ablate or engrave it away. With materials like stainless steel, titanium and hard chrome, the heat from the laser beam will cause an oxide layer to form. Multiple passes of the laser over the material will make the oxide layer darker or allow for subtle color variations. If a variable pulse width fiber laser is used, experimenting with laser pulse width, power, marking speed, fill density and pulse frequency can produce a variety of color shades ranging from black, blue, red and green. Color marking sounds fascinating but it comes with its own set of challenges. Different materials can produce very different results and there are endless combination settings that can be adjusted.
Most stain marking is simply done to get a non-penetrating dark mark on the suitable materials that were mentioned above. Stain marking is attractive, permanent and non–contaminating. It is a technique frequently used in the identification of medical instruments or tools because no inks, paints or chemicals are used. Stain marks have microns of penetration into the surface of the substrate and, although the marking won’t come off with time or handling, it can be sanded or abraded off. It is not a good technique for parts that are marked on “wear” surfaces.
The secret to good stain marking is having the proper focused spot size from the laser. Most fiber laser marking systems have beam delivery optics that are designed to focus the laser to a very small spot; too small for stain marking. One technique for increasing the laser spot size is to simply move the substrate away from the focal point of the lens slightly. This technique works well for flat surfaces although “out of focus” can be a bit subjective. The out of focus technique doesn’t work well with round or radiused parts. As the defocused beam moves around the radius, it either begins to come back in to focus or gets further out of focus. The ideal solution is to have the laser beam focus to the correct spot size at the focal point of the lens. Using this technique, the laser will maintain the correct spot size throughout the depth of focus of the lens. At Jimani we achieve this optically by passing the laser beam through a reversible beam expander before it goes to the focusing lens. By “de-collimating” the laser beam we can increase the size of the focused spot as well as increase the depth of focus through the lens. This adds a bit of expense to the system but that expense is fully justified by the improved stain mark performance.
Any style of marking can be performed with any of the above mentioned techniques. By styles, I am referring to text or serial numbers, graphics or machine readable codes. Mark types include text, graphics, bar codes, and logos. Essentially anything that can be reduced to a graphic file can be marked using a laser. Most fonts, including bar codes (2D Data Matrix, QR, UPC, etc.), are now a part of the laser marking software included when you buy a marking laser.
Editor’s Note: This article was first published in Photonics Online. You can read the original article here.
You may be interested in these posts:
- How fast can I laser mark a part?
- How to Laser Mark Aluminum
- Laser Marking Odd Shaped or Large Parts

Topics: Fiber Laser Marking
.png?width=295&name=footer-logo%20(1).png "Jimani, Inc. Laser Marking Systems and Laser Job Shop")