3D Medical Manufacturing Improves Laser Marking Speed
3D Medical Manufacturing, located in Riviera Beach, FL and founded in 1994, is a Contract...
By: Jim Earman on 10/5/10 8:56 AM

What happens when you need to make a machine readable 2D Data Matrix barcode mark on shiny, metal parts that are not flat?
There are several things working against a high quality mark.
1. A highly reflective surface which makes it difficult, if not impossible, to uniformly illuminate the marked surface for the reader.
2. On very small parts the “grain” of the metal affects how the laser marks it and how the reader sees it
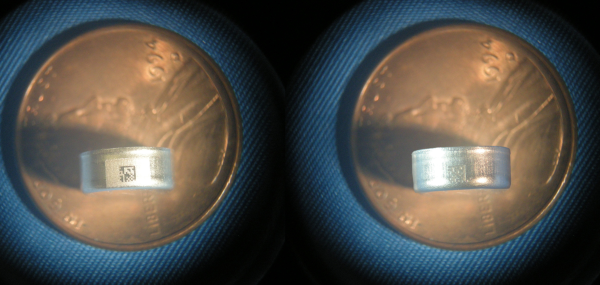
3. A small cell size in the 2D code. The 2D cell size of the part in the photo is .004”.

This particular medical industry part, a hearing aid battery case, was extremely difficult to read when the 2D mark was made on it. The part on the right in the photo shows the lack of contrast of the mark and the non-uniform reflections from the reader light source. The solution was to use the laser to first create a background for the mark. We burned a rectangle that was larger than the 2D mark itself. We used low power and high speed so that I only frosted the surface of the part and didn’t add much additional time. The frosting served the purposes of masking the grain of the metal and dramatically reducing the reflectivity of the surface. The resulting mark shown on the left had side of the photo has a much more defined 2D mark and much less reflectivity.
Regarding reading, we could occasionally get the part on the right to read but it was very sporadic and frequently would not read at all. The part on the left (and, a few thousand more just like it) read quickly and reliably.
Jimani used the same technique some time ago for a different customer that had a part that was also round and needed a 2D mark but the surface wasn’t particularly reflective so reflectivity wasn’t the big issue. That part was very oily when it was being marked and when the 2D mark burned on the part it also burned the oil and there was a resulting brown film that was spread over the mark. That film was nearly the same color as the 2D mark and the reader couldn’t distinguish the mark from the film. Parts couldn’t be read without wiping them off and the automation had no means of wiping the mark. Parts were being read immediately after marking and parts that didn’t read were rejected. We used the same technique of marking a rectangle over the 2D marking area but in this case I marked the rectangle after the 2D mark was made. The laser settings were such that the laser burned off the oil film without affecting the 2D mark.
3D Medical Manufacturing, located in Riviera Beach, FL and founded in 1994, is a Contract...
There are three or four good laser marking software packages on the market. They are all pretty...
One of Jimani's regular job shop engraving customers showed up today with a problem. He had 2...